Monday, December 31, 2007

Three's Company Grouting!

So yesterday was spent in its entirety grouting the kitchen floor and cleaning the grout off the tiles. I don't know why I thought this would be a much quicker job than the rest of it, but I envisioned us having our late afternoon off. Needless to say, that didn't happen. We started about 11AM and friend Suz was on-hand to help. Eric mixed up 1/2 a bag of grout after we did mathematical gymnastics to figure out the grout to admixture ratio in pounds vs. ounces, etc. Since there were 3 of us and 3 floats, we all took a section at the back of the kitchen and started slathering the grout into the seams. We got about 2 rows done when Suz and I concluded that we better start the cleanup. So Eric continued to grout and Suz and I hit the tiles with sponges. We were about halfway through the completed section when we decided Eric had to take a time out and help clean tiles before we had grout to chip off instead of wipe down. We whizzed through that and went back to grouting but had to dump a bit of the batch when it got unworkable. Suz departed to watch the Browns. We finished the rest of the floor by adjusting our methods. First, we mixed up the batches in much smaller portions (about 5-6 pounds of grout instead of 12). That way both of us were able to work the grout and by the time we finished the batch we could each return to our starting places and start the cleanup process. That went something like this: (1) with bucket of water at hand wring out the sponge as much as humanly possible (and it will still seem impossibly wet) and give the tile a first wipe-down to get the majority of excess grout off the tile, (2) rinse sponge, (3)use the rounded edge of the sponge to shape the grout seam, (4)rinse sponge, (5) go back over the tile, especially the edges along the seams to remove smeared grout), (6) rinse sponge, (7) continue ad infinitum until all tiles have been cleaned once, then get clean water and go over all of them another ten times and marvel that they still have significant grout haze. Here's me on one of the earlier re-cleans (as evident by the grin):
We took a "lunch break" at 4 and returned to grout the last 2 rows of tiles. Suz came in to aid in the final cleaning(s). Here we are happy to quit for the day (at 8:30PM):
For the last 2 passes we used a grout haze remover (from Lowe's) diluted in water in various ratios. We'll be getting some more of that to go over the tiles one more time in a stronger solution, but they still lookk great! The grout is actually "London Fog" grey and dried a bit lighter than expected, but will still go a long way to hiding dirt.

Saturday, December 29, 2007

Holiday hiatus

We took off from Sunday 12/23 through Thursday 12/27 to visit Eric's family in sunny Ft. Lauderdale. It was a warm and welcome respite from the pace we'd kept in the weeks before Xmas. We intended to finish the tile job when we returned on Thursday night so the cabinets could be installed Sunday, but we decided that was just a little too ambitious and, after all, it is the holidaze so maybe we should cut ourselves a break. With that in mind we re-scheduled the installers for 1/8/08 and gave ourselves a little breathing room. Nonetheless, we still want to complete the job so it has plenty of time to cure before they start hauling cabinets over it and we start banging around on it. So last night we went to the house and spent a couple hours finishing cutting and mortaring in the edge pieces. Here's me setting tiles:
Today we went by and did a little cleaning of residual thinset so we can grout tomorrow.
The remainder of today was taken up by a few fun tasks (because shopping is almost always fun). We started at Lowes and ordered our GE stove and microwave and killed the $1500 in gift certificates that we'd received as a rebate for our cabinet purchase. Then we headed out to the west side to L&E Stone Kitchen Supply to check out granite colors for our countertops. They furnished our "old" kitchen's cabinets and granite countertops for an amazingly reasonable price and we've been very happy with them. They didn't have a style of cabinets we liked for the new kitchen, hence, we ordered KraftMaid from Lowes. Alas, when we got there today we learned that they've set up a back showroom and have 3 NEW cabinet styles available, one very similar to the ones we got. Darn. That woulda saved us some major cash, but we're (at this point) not unhappy with our choice, and as Eric pointed out, they don't have some of the great features our KraftMaids have. We were delighted that John from L&E recognized us (it's been well over a year) and quickly worked up a great quote for 3 different granite colors. He said we gave him scratch off lottery tickets after our last purchase and he won 5 bucks, which he thought was pretty cool. We took granite samples home and decided upon "Blue Pearl" as it's a little lighter (but still dark) and will nicely complement the blue in the Mexican tiles for the backsplash. Eric is psyched that the quotes came in at about half of our budgeted amount for the countertops! Since they did such a great job in the past, we gave them a deposit and booked appointments for measuring once the cabinets are in and installation a week later. So by 1/22 we should have fabulous new granite countertops in the kitchen! On another note, Justen has completed the decorative portion of the back porch and hauled away the majority of debris, so our backyard no longer looks like the local dumping ground:
He's still got to do some serious finish work on the concrete steps as they are pretty rough, but that will likely have to wait until warmer weather. Hopefully that means we'll start to see interior trim pretty soon!

Saturday, December 22, 2007

The Tiling Job that Stole Christmas

Today we cut tile and set the tiles at the edges of the floor. As with every other part of the tile job, it isn't so hard as it is time-consuming. And it is hard in some ways. The kneeling, squatting and standing is a helluva workout. Floor of porcelain, buns of steel. And while we did not finish today as we had hoped, we did get all of the tiles which go under the cabinets set, so if we have the cabinets installed on Dec. 30 as planned, we should be OK if we can grout on the 28th.

First, we finished the full tiles at the back and front of the room.


Next, Mary hit the tile saw. Once again she has proven herself an excellent Cutter (scooter club reference). Eric designed the high-fashion poncho. The 2 tile saws are both loaners, one from friend Andy Miller, the other from our porch contractor Justen. As the pump on the big tile saw was not working, we started with the small one. After a bit we figured that as a team I could pour water while Mary cut. And we did pretty dang well. Thanks to Andy & Justen!


Finally, we quit. It looks more complete than it is. About 1/2 of the edge tiles are not yet mortared, but that will happen soon enough.


Friday, December 21, 2007

The nightmare isn't over yet....

OK, so tiling isn't really a nightmare, I'm just being melodramatic. We'll blame it on a lack of sleep. We got to the house first thing this morning and our friend Barb was waiting for us. She wants to tile her kitchen so she figured helping with ours would be good experience. She came with her own kneepads and great tips from her handy mom about making tile cuts. The first thing was to snap center lines and dry lay the tiles. This enabled us to look at the variation in color and pattern of the tiles across the floor and stage them as we eventually want the room to look:
It also let us know where the tiles would fall from center and we adjusted our center starting point by moving it forward so that we'd have full tiles from the archway and the smaller cuts by the back door. We're using 18" Italian ceramic slate-look tiles that we purchased from the Tile Shop. We identified 3 distinct designs in the tiles and sort of arranged them with random patterns in mind. Once we liked what we saw on the floor we divided them into even piles along each wall in backwards order so that we could start from the center and work our way across selecting the tiles from each pile and having them fall in the pattern we liked. It helped that we're only laying the body of the room today with the full tiles. We'll save the cuts around the border of the room for tomorrow. Here are our waiting to be laid tiles (insert your own joke here):
Next we opened and arranged our SunTouch radiant heat mats (special ordered from Lowes):
When we began reading the instructions (I know, we should have done that a week ago) is about when it started to get interesting. First, you need an "ohm reader" to determine whether your mats are functioning. If you don't use this device to make, like 3 readings, your warranty will not hold. Then we realized that we have a gazillion metal nailheads and we're about to put down electric mats. When we took our tile class many months ago we had not planned on the radiant heat flooring...this was a more recent fantasy of warm tile floors in our kitchen and bathrooms...so our instructor skipped over that part, but I vaguely remembered the term "short". The great thing about the Tile Shop is they told us to call whenever we had a question so we did. Tracy (our fabulous tile rep) was awesome and had immediate answers. First off, bad news, we SHOULD HAVE countersunk all of the screws last night. Then you set them in thinset and tile right over them. So we traced the outlines of the heating mats on the backerboard and Barb and I set about countersinking them. Meanwhile, Eric headed off to the Tile Shop for a "Loud Mouth". This ingenious little device tests the mats to ensure that they are working AND notifies you if you accidentally (god forbid) cut one of the wires while tiling. Here's Barb ruing that she volunteered for this duty: So as I was countersinking and cursing, once again, our porch contractor (and soon to be trim carpenter) Justen arrives with an awesome pneumatic drill that kicks those puppies into the denshield with the greatest of ease. So I took over the screw sinking with the magic drill and Barb siliconed all of the holes. At long last (too long for Barb, she had to take now-bored son Mack home) we got to start tiling about noon. Eric prepped the thinset and troweled it. I laid, secured and spaced the tiles (his job was definitely harder). Here we are at row one:
We got about 25% done and decided (at 3) that it was lunchtime:
The formidable Mortar Man:
About 10PM we decided to call it a night. We've got 2 full rows to set tomorrow before we start on the edge pieces that need to be cut. Justen is the hero AGAIN today as he brought in his larger tile saw that should make this go breezily. This photo looks a lot like the first one, but what's different? Tile spacers let you know these have been set!
Must sleep now.

Thursday into Friday delirium

I feel like we just pulled an all-nighter on our home improvement final. With the delivery of the kitchen cabinets yesterday, the looming deadline of their installation (12/30) became apparent. So we's gots some tiling to do. But before we can start that, we needed to lay the backerboard substrate....which we did Thursday night into the wee morning hours. And, like school, now I'm keyed so I can't get back to sleep. You benefit by getting a blog entry, but don't push it, I'm cranky! We get to the house at 6:30PM and dry-lay the first two rows of DenseShield (obtained at the Tile Shop). It's pretty cool stuff as it's not too heavy so even I can manage a 4x4 sheet of it. It scores and cracks like drywall and it's waterproof on the "up" side (literally, the side you leave facing up to tile on. Here we go....in a 5 gallon bucket, Eric mixes half a 50# bag of thinset with the appropriate amount of water...one pitcher, I don't know the measurement, go read the bag..also, LOVE the mortar paddle attachment for the drill...it made mixing "easy" (well, easier)..go get one. E uses the 1/4" square notch trowel and lays out a 4x4 patch of mortar. We'd pre-cut the sheet to fit the wall. Here's the man in action with the sheet ready to go behind him:
We lay the sheet into the mortar bed and "set" it with a gazillion screws. Every 4" around the perimeter and every 6" in the body of the sheet. Man of the evening Brian Bayer, shows up at 7PM to help with the fixation of the backerboard with a gazillion waterproof backerboard screws. It took us until Brian left at 9PM (something about having to go practice with his band) to afix the first row of sheets across the back of the kitchen that Eric had mortared. I feared this would take forever and came up with a workable technique: use a hammer and pre-set all of the screws in the denseshield, then come along with the drill and put them all in. That easily cut the setting time in half (and it still took forever). The screws get level-set in the sheet, NOT sunk. Then, because we're moisture-averse freaks, we siliconed all of the seams and any screws that accidentally got countersunk. It's 10PM, we're about halfway done and I'm starving...time for a Wendy's break:
A little chicken nuggets and Diet Coke rejuvenated me and we resumed our labor. It's back-breaking, blister-inducing work. When we finally got finished we realized it was 2 AM. Holy crap man, it's two in the morning and we promised Barb we'd meet her back here at 8AM to tile...put the camera away and let's go get some sleep!


Thursday, December 20, 2007

Thursday Ta-da!

A boatload of work got done today with a total of 10 people on the premises at various times for various tasks. Let's start with the ever-appreciated and lovely Mz. Suz who dedicated her last day before heading home for the holidays to painting our bathroom. Here she is demostrating her darling technique with the Slow Green:
The installers from Evans Carpet were on the scene and knocked out two rooms in just under two hours to great effect. Here's the now cozy master bedroom:
And the walk-in closet with the same carpet:
The KraftMaid delivery truck showed up at 11 a.m. and loaded our dining room with the accoutrements to make our kitchen fab (Suz does her best 50s pose):
Both electricians were on and off site throughout the day making stuff happen like getting the master bathroom wired. And note the Jetstream Blue color on the walls...that was one of my accomplishments. Here's Brandon putting on the finishing touches to keep us illuminated:
One of my favorite silly things of the day was getting the doorbell installed. They got the bell up when Dustin asked "do you have the pushbuttons?" Uh, no. A phone call to Eric who remembered we purchased a lot (literally, like 5) at some garage sale or auction and dug them up in our basement. They were cooler than any I've seen lately (according to the bags they were Restoration Hardware). Here's the back ringer:
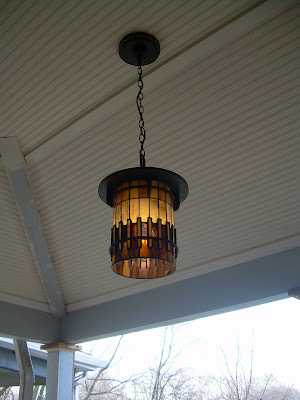
And my most favorite of the day...getting our front porch light installed (note the painted porch roof which I got done when it was a warm-ish 40 degrees yesterday):
At night it even makes it look like real people LIVE here:
On other fronts, Justen got the back porch roof installed so sometime in the next few weeks the guys can come back and put up those fixtures. He was also instumental in getting our 36" corner base cabinet INTO the abode. It just wasn't fitting through the 32" back door for the delivery guys and the front door is no larger. In two minutes he had the door off its hinges...but it still wasn't working. Five more minutes and the jamb was gone, the guys removed the cabinet from its' massive box and delicately maneuvered it through the opening and deposited it in the dining room with its counterparts. We went to lunch and the door and frame were back together...Thanks Justen!

Wednesday, December 19, 2007

Wednesday...more photos!

For this you can thank Eric for remembering the camera. I'm off for the remainder of the week so I'm working at the house. First order of business for today was to paint the new front porch ceiling so that the electricians can hang the pendant light...the weather cooperated and gave me a 40+ degree day to paint outside. Check. They'll be hanging it tomorrow. Next I started cleaning the doors that have been brought upstairs like the French doors in the pic below...which is really of the stained glass pendant now hanging in the study:
Here's one of the spotlights in the "wine cellar" or that creepy weird room in the basement:
Here's the decking on the back porch that Justen completed today. He promised us a ceiling tomorrow so the electricians can hang the back porch light and fan:
Here's the upstairs porch light in action...and Eric with funny glowing eyes (the downstairs back porch light matches, but is the larger version):
Thanks to marvelous friend Suz who primed the downstairs bathroom and painted the ceiling in there today. Eric manned the shopvac to prep the upstairs for the arrival of carpeting tomorrow. Let's see if our run of good luck in remembering to bring the camera keeps up!


Monday, December 17, 2007

Monday photo bonanza!

We had 2 electricians on duty today: Brandon and Dustin. Brandon (aka "the kid") was mostly relegated to the basement. I thought his primary duty was wiring the lights in the "wine cellar" (which seemed to take FOREVER). However, it turns out he may have had a more important function. He was also apparently in charge of making the connections between the installed fixtures and the electric panel. You've seen this photo of the master bedroom before, but this time, the light (and fan) WORKS:
Humorously, Dustin made sure we knew where each of the remote controls for the light/fan for each room is. We think that he believed they'd only work with the accompanying remotes. Fortunately they also work with the switches he installed on the walls of each room! Here's the installed chandelier at the top of the steps outside of the master bedroom. We got it at Grand View Mercantile, an awesome consignment shop in the Short North:
Dustin was a trooper putting up the dining room lights today. We set this one high enough that it makes head-wacking an unlikely occurence:
The light fixture for the upstairs bathroom. There are two, but the other one was missing a bracket so Dustin is looking for something to make do:
The light fixture for the guest bathroom:
One of my Monday jobs was to paint the coat closet. I re-used the living room ceiling paint (jersey cream) and the guest bedroom wall color (harvest gold):
Here's a shot of Dustin hard at work hanging the matching pendant light in the dining room:
The illuminated pendant and its matching fixtures: the wall sconce and a sliver of the chandelier from above:
Job number two for the day was to paint the hallway to the basement. You might recognize the colors in re-use here too, but in reverse. The ceiling is the asparagus on the walls in the study and the walls are the citrine color that is the ceiling in the study:
"Porch Guy" Justen was here today too. He had a cellophane tent with space heaters set up in the backyard and was working on the masonry for the back porch. Then this evening he started bringing up the salvaged trim pieces from the basement and matching them with the appropriate spaces. It's pretty cool to see the doors come out of the basement and sit next to where they will ultimately be hung!

Sunday, December 16, 2007

As seen on This Old House

If you've been thinking about installing a pressed tin ceiling in your historic house, we can recommend it. I think it probably rates as "moderately difficult" in skill level. On our first round this morning we built off the middle row we started yesterday and completed towards the back of the house figuring our skill level would improve as we continued and our best work would be the most visible from the archway. We left the row on the far left open for the VERY LAST figuring it's going to be covered in cabinetry anyways and if we totally goofed up any of the panels, we could use it (them) where it would be buried. Here's me admiring our work and declaring it "smoothie break time":
We returned revived and started working our way towards the front of the house. Here's where we paused to rejoice that we didn't have to cut any more holes for the can lights (and really, it wasn't that hard in the first place):
We were cruising along when we broke the last of our perfectly-sized drill bits. This merely meant we had to use a slightly smaller size bit that we had available, but it meant a little more muscle had to go into the hammering. About 3/4 of the way through we also realized that if we kept going at our current pace with our supply of cone-head nails, we'd be out about 10 panels before completion. Time to ration. We compromised by using small tack nails along all of the borders with the walls as, ultimately they will be hidden by cornice (to be put up after the cabinets are installed). In all the job took us about 10 hours to complete, but WOW! what an amazing result! We were totally psyched about our ten panels yesterday, but check this out:
And a view from another angle through the archway:
So there you have it, our Sunday's worth of effort. We were thoroughly impressed with ourselves that no panels were damaged in the undertaking. We needed 54 to cover the ceiling, but ordered 56, just in case we goofed anywhere, and now we've got 2 extra tiles! Now that the ceiling is done, it's time to get cracking on the floor...we've got cabinets coming!

Saturday, December 15, 2007

We begin with the tin

Most couples might catch a movie on a Saturday night. Eric and I decided to start the installation of our pressed tin ceiling. We begin with a sturdy plywood ceiling installed by our contractors:
Mathematically lucky for us, our room measures 12'x18' and the tin tiles come in 2'x2' squares. Our first order of business was to find the center of the room. We used a snapline to snap vertical and horizontal guidelines at center. From there we snapped a 2x2 grid across the whole ceiling. We started in the one center square that did not require us to cut any holes for lights. We progressed from there on an east-west grid through the first row. Then we came back to the center-ish tile to commence the second row.We heeded the advice of fellow housebloggers on a couple things:
1. We used an adhesive on the backs of the tiles for extra sticking power
2. We drilled pilot holes for the manufacturer-supplied cone-head nails to make it easier to nail in and decrease the number of swings necessary (thereby reducing the odds we'd accidentally dent our semi-fragile tiles). Here are our first two:
We didn't get too far before we had to cut a hole for one of the can lights. This was a team effort. Eric would measure where the center of the 4.5" can light would fall on the tile and we'd mark 4 points (N,S, E,W) to guide the cutting. Then Eric drilled a large hole in the center of the marks. Here I took over with the tin snips and cut a circle approximating the shape of the can opening (tin snips are a little unwieldy and not precise, but accurate enough):
We used a pretty systematic pattern of nails for each tile. Another couple of important details:
1. The factory finished tiles (ours came from MBoss, Inc. in clear coat) have a barely visible orientation, meaning that the finish leaves a detectable direction in which it was applied. We were careful that every tile we put up had the finish facing in the same direction.
2. The tiles are overlapped in setting and we determined that the overlap should be towards the rear and west of the house so that the seams are invisible from the main room through the arch.
Day 1 progress: Eric and I set 10 tiles (4'x10'). We'll be back at it tomorrow!


Scheduling installations!

Good news on two fronts today. First, our carpet will be installed in the master bedroom and closet next Thursday (12/20). Also, our KraftMaid kitchen cabinets get delivered that same day. The installation guys for that were ready to go immediately on Friday, or the week right after Christmas. Since we still have to put up the tin ceiling and tile the whole floor, we put them off for a week, but, get this, they are going to do the installation on a SUNDAY! Really, they think it should only take a day, so on 12/30 we will be having the cabinets installed. You know what that means? They should be in BEFORE THE NEW YEAR! Now, we'll be crossing our fingers and hoping it all shakes out that way, but given that is has the POTENTIAL to, we're thrilled! Come on Justen...may the weather hold out and we could have the back porch done too!

Friday, December 14, 2007

As promised...PHOTO BONANZA!!!

OK, this one looks familiar, but it's fun for comparison. It's the steps "before" painting and sanding:
And a somewhat blurry photo of the steps "after" (note how we left the extension cord in there for true comparison):
This light is in the hallway between the dining room, kitchen and guest bedroom. I promise it is more impressive in person. Here it is peeking through the arch (it's a little weird perspective, the round thing under it is the smoke detector):
The close-to-flush-mount bronze-y fan in the low ceiling guest bedroom:
Our electrician really likes this one. It's the sconce next to the front door in the entry/dining room.
Hopefully on Monday the matching chandelier and pendant will be put up. And the hall fixture above is part of this collection. Below is our little tri-spot light at the top of the steps the the second floor to illuminate future art and the steps:
The more mod ceiling fan in the master bedroom worked well even without a downrod. We're loving the color of the brushed metal with the cool hues and the wood blades with the cocoa paint (barely visible in this shot):
The searched-for pull cord light for the coat closet (Lighting Universe). Yes, someday that tacky string pull will be replaced:
Not that you necessarily wanted to see inside the guest bedroom closet (and in its pre-painted state, maybe you shouldn't). But here's the light for it anyways. After all, you've been so patient with our camera forgetfulness you deserve a little voyeurism:
And tracking Justen's progress today, the block pillars are in. I am only boring you with a photo of one. Trust me, all three look really similar to this:
BONUS PHOTO! And a surprise for us! As we were pulling away after checking out today's work, I noticed that the exterior porch light was in too! I ran back in for a photo op, but really to make sure the French doors were locked (good thing I checked):